The entire application for the Intintiki Indiramma Kuttu Machine Scheme happens on the official TGOBMMS portal — no app download, no visiting any office at this stage. You can fill it from your mobile phone in about 10–15 minutes if your documents are ready. Below is every single field on the form, explained in the exact order they appear, so nothing catches you by surprise.
Step 1: Open the Application Form
Visit the official OBMMS portal link above, or search “TGOBMMS” on Google and navigate to the sewing machine scheme page. You’ll land on the Intintiki Indiramma Kuttu Machine Application Form for Financial Year 2026-27. Fields marked with a red * are compulsory — you cannot submit the form without filling these.
Step 2: Fill “Personal Details of Applicant”
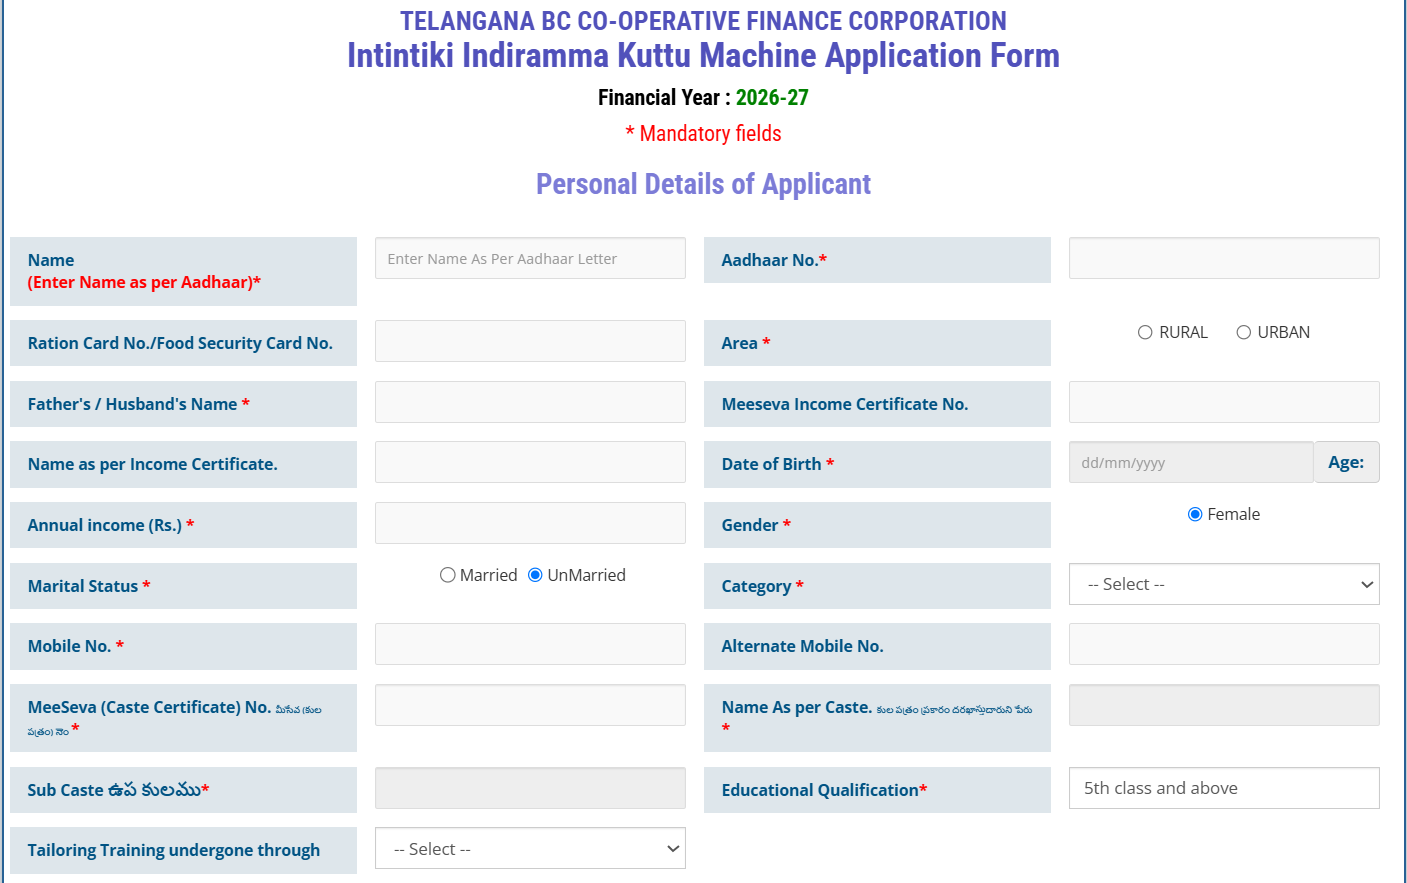
This is the longest section of the form. Fill each field carefully — most are auto-validated against your Aadhaar, so any mismatch in spelling will cause errors later.
| Field | What to Enter |
|---|---|
| Name * | Exactly as printed on your Aadhaar letter — no nicknames or short forms |
| Aadhaar No. * | Your 12-digit Aadhaar number |
| Ration Card No. / Food Security Card No. | Auto-fetches in most cases once Aadhaar is entered |
| Area * | Select Rural or Urban based on where you live |
| Father’s / Husband’s Name * | As per your official documents |
| MeeSeva Income Certificate No. | Not compulsory, but enter if you have one — it can auto-fill the next two fields |
| Name as per Income Certificate | Auto-fills if you entered the certificate number above |
| Date of Birth * | dd/mm/yyyy — your age is auto-calculated from this |
| Annual Income (Rs.) * | Your family’s yearly income — keep within ₹1.5 lakh (rural) / ₹2 lakh (urban) limits |
| Gender * | Locked to Female automatically — this scheme is for women only |
| Marital Status * | Select Married or Unmarried |
| Category * | Select from dropdown — e.g. general, orphan, widow, disabled, as applicable to you |
| Mobile No. * | A number you actively use — all future updates are sent here |
| Alternate Mobile No. | Optional backup number |
| MeeSeva Caste Certificate No. * | Compulsory — your BC caste certificate number |
| Name As per Caste Certificate * | Auto-fills once the certificate number is entered correctly |
| Sub Caste * | Your specific BC sub-caste, as shown on the caste certificate |
| Educational Qualification * | Select your qualification level, or “5th Class and Above” / illiterate options if applicable |
| Tailoring Training Undergone Through | Optional dropdown — select if you completed any formal tailoring training |
Step 3: Fill “Address Details of Applicant”
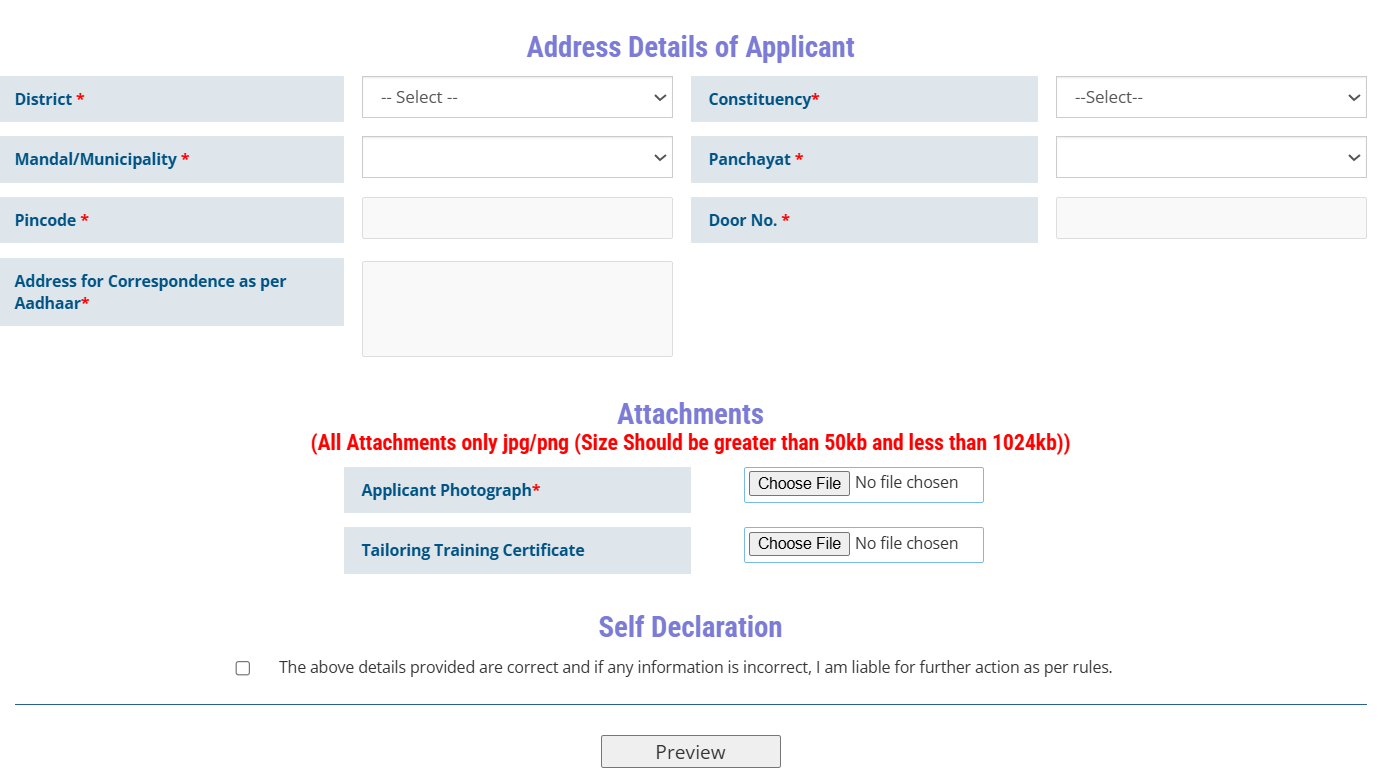
| Field | What to Enter |
|---|---|
| District * | Select your district from the dropdown |
| Constituency * | Select your Assembly constituency — this determines which 1,000-beneficiary quota you fall under |
| Mandal/Municipality * | Select based on your District and Area (Rural/Urban) choice above |
| Panchayat * | Select your Gram Panchayat (rural) or local ward equivalent |
| Pincode * | 6-digit PIN code of your address |
| Door No. * | House/door number as per Aadhaar |
| Address for Correspondence as per Aadhaar * | Full address exactly as it appears on your Aadhaar card |
Step 4: Upload Attachments
Only JPG or PNG files are accepted, and each file must be between 50 KB and 1024 KB in size.
- Applicant Photograph * — Compulsory. A clear, recent passport-size photo.
- Tailoring Training Certificate — Optional. Upload only if you have one; it may improve your selection priority.
Step 5: Self Declaration & Preview
Tick the self-declaration checkbox confirming that all details you’ve entered are correct — note that you’re legally responsible if any information turns out to be false. Then click the Preview button.
On the preview screen, go through every field one more time. If you spot a mistake, use the Edit option to fix it before submitting — this is your only easy chance to correct errors.
Ready to begin? Open the official application form below and follow along with each step.
Open the Official Application Form →Step 6: Submit & Save Your Application
Once everything looks correct, click Submit. You’ll see a confirmation message with your unique Application ID — copy this down or take a screenshot immediately. You can also click “View Registered Application” to download/print your filled form.
Take a printout of this application, attach self-attested copies of your Aadhaar, Ration Card, Caste Certificate, and Income Certificate, and submit the file at your local MPDO office (rural) or Municipality office (urban) to complete the process.